Generate flowcharts from method claims
Generating flowchart figures from method claims
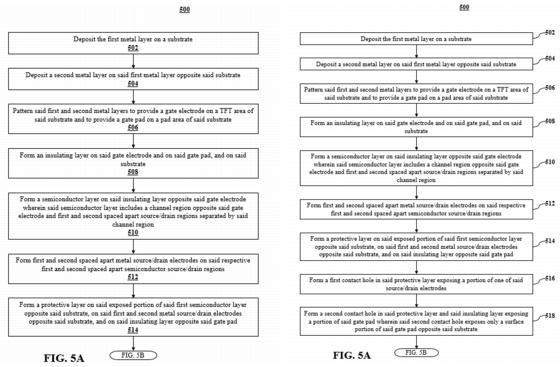
ClaimMaster allows you to quickly generate draft flowcharts from method claims, either in Visio or PowerPoint format. Individual method steps will be converted to flowchart boxes and numbered according to your selected numbering scheme. You also can control the overall flowchart layout and style.
Getting Started
To generate flowcharts, perform the following steps:
- From the ClaimMaster Ribbon, click on the Time-Saving Tools menu, then select Create Flowchart Figures from Method Claims:

Feature Options
Once this option is selected, ClaimMaster will bring up a dialog displaying the first identified method claim with individual limitations broken out into separate boxes. The following options are available from this dialog:
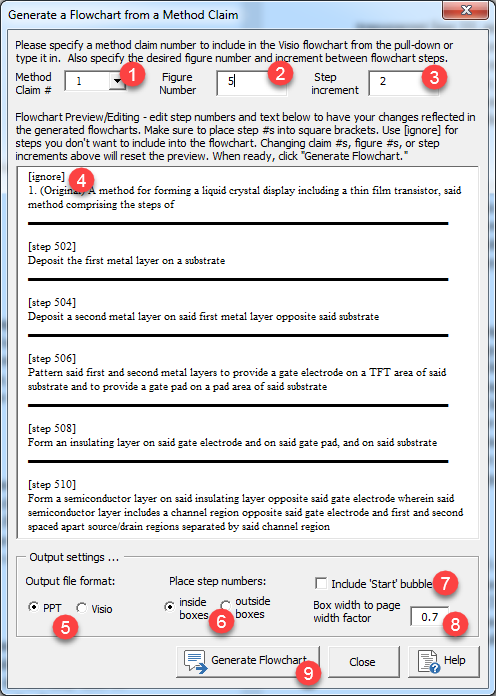
- Use this selection menu to pick one of the identified method claims from your specification. Once a claim number is selected, ClaimMaster will regenerate the preview boxes for each specified claim limitation.
- Here you can specify the preferred figure number. All steps will be numbered as multiples of the specified figure number (e.g., 3), incremented by the specified fixed step (e.g., 302, 304, 306, etc).
- Here you can specify the preferred step increment (default value is 2). Steps in the flowcharts will be incremented based on the selected increment. For example, if the current figure number is set to 6 and step increment is set to 3, steps will be numbered as 603, 606, 609, and so on.
- In this text field, you can preview and edit the draft flowchart. For example, you can edit step numbers and any limitation text to have your changes reflected in the generated flowcharts. The edited text is what will be used for filling-out the final flowchart. Notes:
- Make sure to place step #s into square brackets
- Place [ignore] for steps you don't want to include into the flowchart or just remove them from the text field.
- Changing claim #s, figure #s, or step increments above will reset the preview.
- If you have more steps than can fit on one page (e.g., because you have many steps or because steps have a lot of text), ClaimMaster will automatically continue the steps on the next page of the flowchart. You can try to adjust box width/page width factor (item 8) to fit all boxes on one page.
- Specify whether to output the flowchart in PPT or Visio formats. If must have Visio installed for ClaimMaster to generate figures in Visio format.
- Specify whether you want to place step numbers inside or outside of the boxes in the flowchart.
- Check this if you'd like to include an intro bubble in the beginning of the flowchart and what word (e.g., "Start", "Device", etc.) to use in that bubble. Here you can also specify line width for the flowchart and the desired font name/size.
- Box width/page width factor (between 0 and 1) lets you specify the related width of the boxes compared to page width. For narrower boxes, select a smaller number. For wider boxes, select a number closer to 1.
- Click “Generate Flowchart” to generate a draft flowchart figure in the specified format.