Prompt crafter
LLM Prompt Crafter [+Drafting Option Only]
If you need to construct a more complex LLM prompt using information from the document, such as part names, acronyms, or claim limitations, you can switch to the "Prompt Crafter" tab to add information into the LLM prompt from the document. The following features are available in the "Prompt Crafter" view:
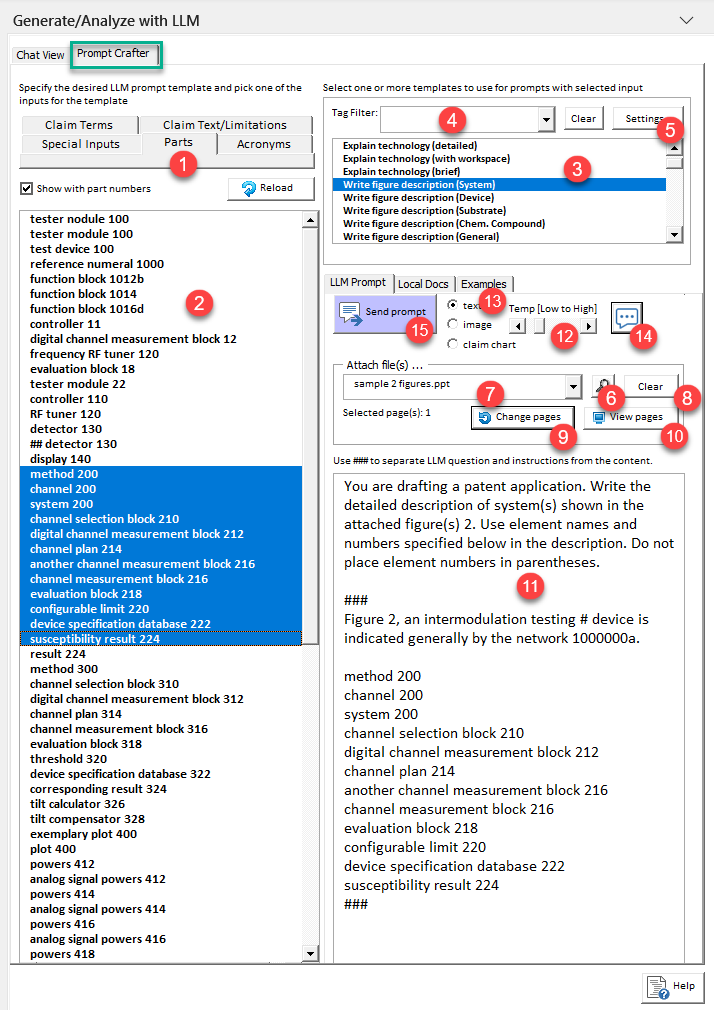
- Use this tab to select one of the inputs from the document to enrich the stored LLM prompt template via the [INPUT] variable. The following inputs are available
- Special inputs:
- Text in the preview window - allows applying LLM transformations on the output produced by the previous LLM prompts
- Selected text in the document
- Surrounding word/sentence/paragraph at the cursor's current position
- All document text
- Claims text (if any) found in the currently open document
- Abstract text (if any) found in the currently open document
- Detailed Description text (if any) found in the currently open document
- Brief Descriptions of Drawings text (if any) found in the currently open document
- Full specification (without claims) found in the currently open document
- Part names (and optionally numbers) extracted from the document
- Acronyms extracted from the document
- Terms extracted from claims
- Claim text and individual limitations
- Click on one of the rows in the table to select the specific [INPUT] value to be inserted into the LLM prompt
- Specifies the name of the LLM prompt template, where the [INPUT] variable will be populated based on the selection from the left-side table (item 3). You can specify any prompt you wish - for example, helpful prompt include directions for LLM to define or explain terms, add more information, summarize text portions, or draft certain section of the patent document using provided inputs. However, do not pass sensitive data as input unless you review and are OK with LLM data usage policies. There many different operations LLM can perform on the passed-in text, but some of the interesting things you can ask LLM to do include:
- Explain or define a technical term
- Re-write a text portion more eloquently
- Write a paragraph or two explaining the state of problems with the current technology
- Generate sample data tables for you
- Draft a section of the application based on the passed-in subject matter, such as title, background, etc.
- Use the filter field to limit the list shown in the template table only to those templates that at least partially match the filter. To remove the filter, click on the "Clear" button.
- Click this button to open settings for LLM prompts.
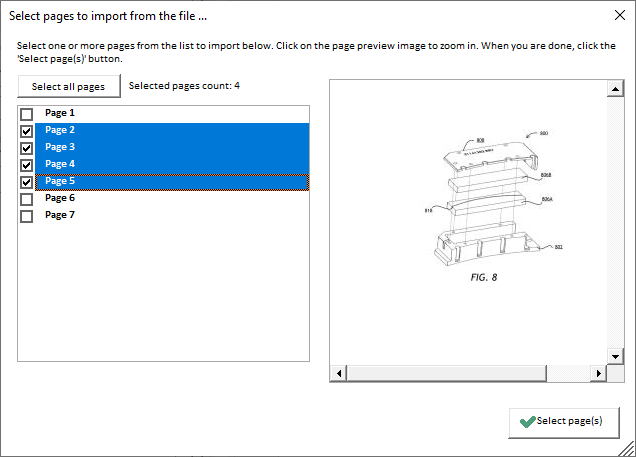
- Press this button to add one or more pages (as images) from a file to your LLM prompt. The pages could contain figures (PDF, PPT, Visio, Word, JPG, PNG) or pages from some other document (Word, PDF) that you want LLM to analyze. If you are providing a multi-page file, you'll be presented with a selection window where you can select one or more pages to include in the LLM prompt, as shown below. You can select a single or multiple pages (with Ctrl+Left mouse click) when using LLM as the LLM source and only a single figure when using local LLMs. Please note that most LLMs impose a limit on the number of attached images (currently at 10 for LLM-4o).
- This field shows the address of the selected file.
- Press this button to remove the selected figure(s) from being added to the LLM prompt.
- Press this button to select another set of pages from the same file.
- Press this button to see the currently selected, full-sized selected page(s) that will be sent to LLM as part of the prompt.
- Shows the preview of the final LLM prompt with the input data inserted. This will be the prompt that will be sent to LLM. You can make edits/adjustments to this prompt directly in the window. If an attached file is specified, ClaimMaster will automatically attempt to extract the following information from the figures/specification and fill-in these placeholders in the template to improve LLM output accuracy:
- [FIGURE_NUMBER] - specifies the figure #.
- [FIGURE_SHORT_DESC] - specifies short description of the figure that would be extracted from the specification, if available.
- [FIGURE_PARTS] - specifies the list of part #s extracted from the figures or part names + numbers extracted from the Specification (item 2).
- [CUR_DOCUMENT_TEXT] - specifies the entire text of the currently open Word document
- [CUR_DOCUMENT_TEXT_CLAIMS] - specifies the text of the claims found (if any) in the currently open Word document
- [CUR_DOCUMENT_TEXT_DETDESC] -specifies the text of the Detailed Description section found (if any) in the currently open Word document
- [CUR_DOCUMENT_TEXT_ABSTRACT] -specifies the text of the Abstract found (if any) in the currently open Word document
- [CUR_DOCUMENT_TEXT_FIGDESC] - specifies the text of the Brief Figure Descriptions section found (if any) in the currently open Word document
- [CUR_DOCUMENT_TEXT_FULLSPEC] - specifies the text of the entire Specification (except claims) found the currently open Word document
- [ATTACHED_DOCUMENT_TEXT] - specifies the entire text of the document attached to the prompt
- [ATTACHED_DOCUMENT_TEXT_CLAIMS] - specifies the text of the claims found (if any) in the document attached to the prompt
- [ATTACHED_DOCUMENT_TEXT_DETDESC] -specifies the text of the Detailed Description section found (if any) in the document attached to the prompt
- [ATTACHED_DOCUMENT_TEXT_ABSTRACT] -specifies the text of the Abstract found (if any) in the document attached to the prompt
- [ATTACHED_DOCUMENT_TEXT_FIGDESC] - specifies the text of the Brief Figure Descriptions section found (if any) in the document attached to the prompt
- [ATTACHED_DOCUMENT_TEXT_FULLSPEC] - specifies the text of the entire Specification (except claims) found in the document attached to the prompt
- Use this slider to make LLM responses more or less random/deterministic. Corresponds to the temperature setting for the LLM. Higher values will make LLM output more random/creative, while lower values like.will make it more focused and deterministic. It's a good practice to always review LLM responses for factual correctness, especially if you are using LLM prompts with settings for higher response randomness/creativity.
- Specify whether the prompt is related to text, image, or claim chart generation.
- Press this button to open LLM settings window.
- Press this button to send the prompt from the preview window (item 7) to LLM. As mentioned above, ClaimMaster does not automatically access OpenAI's or Azure OpenAI LLM services using API. You will only send a prompt to LLM when you press this button.
Specifying a local document workspace to be used for the LLM prompt (RAG)
This tab allows you to specify a particular local document workspace for the prompt as part of ClaimMaster's RAG architecture. In particular, ClaimMaster uses semantic searching to find contextually relevant data based on the conceptual similarity of the input prompt. When you send a prompt to LLM, ClaimMaster will first query its local vector database that contains your workspaces to find the most similar text snippets for your prompt and will then add those snippets to the final prompt of the configured LLM source to improve its output results. RAG instructions are also a part of the template, so you can tell LLM to use ONLY the provided text snippets when forming a response or supplement the response with the information from the snippets, while also relying on its own knowledge.

The following options are available from the Local Docs window:
- Use this drop-down menu to specify the pre-configured local document workspace to be used for the prompt.
- Specify which sections of local documents (e.g., Background, Abstract, etc.) should be used when pulling data from the database.
- Specify the max # of text snippets that would be pulled from the vector database, so as to limit the amount of data to be sent to LLM
- Press this button to test the current LLM prompt with the specified workspace. When you click this button, ClaimMaster will pull contextually relevant data from the snippet database and show the results in the text window below (item 7).
- Press this button to open the document workspace settings.
- Check this box to enable debug output of the prompt lookup, which provides additional information about each retrieved snippet (e.g., similarity score, document source, etc.).
- This text window shows the preview or the result of the RAG lookup. You can also make direct edits to the text in this window and then when you send a prompt to LLM, the edited contents of this window will be used to generate additional context for the prompt.
Providing additional examples/context to GTP/LLM for rewriting
To further improve the quality of LLM output you can also pass example output or additional context as part of LLM prompts. Note - you need to edit the contents of this window before sending text prompts to LLM. This additional example/context text would be configured as part of the LLM template - to add example/context, switch to the "Example/Context" tab when editing a LLM prompt:

Reviewing/editing LLM output
This tab shows the results returned by LLM service based on the provided prompt or any returned error messages, if any. You can make further text modifications to the results directly in this window.

The following options are available from the LLM Output window:
- This text field shows the results returned by LLM service based on the provided prompt or any returned error messages. You can make further text modifications to the results directly in this window
- Click this button to see the differences between the text passed to LLM and the output text produced by LLM. This is a very helpful feature to pick up on any subtle differences between LLM input and output.

- Press this button if you like the results produced by the specific LLM prompt. It will allow you to turn this prompt and associated instructions/example into a template prompt within ClaimMaster.
- Press this button to copy the output of the LLM to clipboard.
- Specify whether you want to insert the output of LLM for a particular section in the document (e.g., "Title", "Background", etc.)
- Press this button to insert the contents of the preview window (item 1) into the open Word document at the location of the cursor in the document.