Interacting with LLMs
Interacting with the LLMs [+Drafting Option Only]
ClaimMaster's patent drafting tools let you interact with the configured LLM using a chat-like interface to generate text and images. You can also store and invoke helpful LLM prompts enriched with the text from your document to generate, rewrite, and summarize text and attached files, such as figures or other documents. In addition, you can also analyze documents, images, and also generate images in PNG or SVG formats, and also generate claim charts with the help of the LLM. To access LLM drafting tools in ClaimMaster, follow these steps:
Getting Started
- From the ClaimMaster Ribbon, click on the Patent Drafting Tools menu, then select Generate/Analyze with LLM:
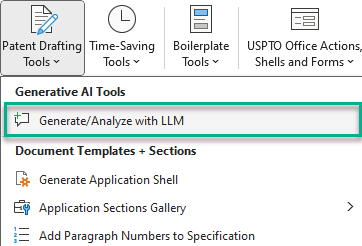
Feature Options
Once you select the feature from the menu above, the LLM chat window will come up. It will be "docked" to the right side of your Word document when it launches, unless automatic docking of patent drafting windows is disabled in Patent Drafting Preferences (i.e., the "Dock drafting windows" checkbox is unchecked). The LLM tool has two views: (1) a "Chat" view where you can quickly generate and send LLM prompts, review LLM answers, and then ask the configured LLM follow-up questions, and also (2) a "Prompt Crafter" view that lets you generate more detailed prompts filled with specific information from the document/figures, such as when you want to populate the prompt with part #s from the specification. The following operations are available in the "Chat View":

The "Chat" tab is generally structured as the standard chat interface, with a "Prompt" section for entering questions to the LLM at the bottom (item 1, green) and LLM responses shown in Questions & Answers tab (item 2, blue):
- This section ("Prompt") is the section where you will enter your prompts to the LLM. You can generate prompts using pre-defined templates or just type in your questions/instructions directly. When writing prompts in this window , you can reference the last LLM answer by asking to "Rewrite this in more detail" or "Add more detail to the last response" or reference any specific LLM answer - e.g., "Rewrite answer5 in more detail" with answer# notation, where the # is the prompt/answer pair # that is displayed in the window above.
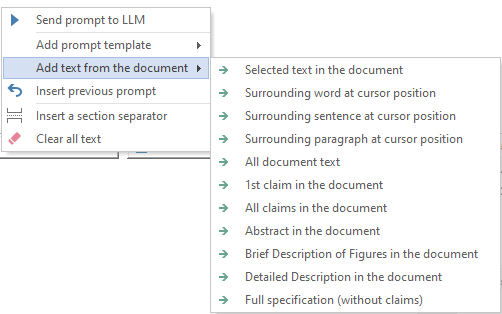
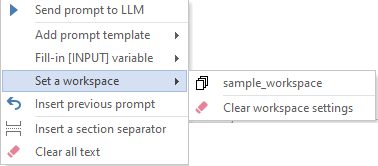
- Right-click on the Prompt window to bring up a menu, which lets you add insert specific document information into the prompt, set workspace, picking from one of the available templates, etc. In addition, you can type "//" to bring up the same menu:
- This section ("Questions & Answers") is where you'll see answers from your prompts to the LLM. You'll see both the question asked and the LLM's answer.
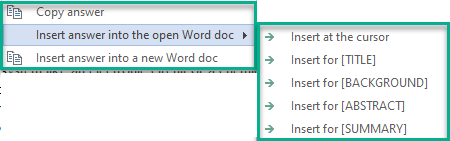
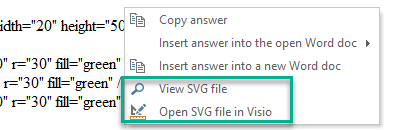
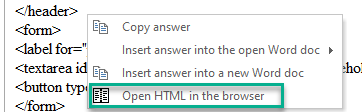
- Right-click on the Questions & Answers window to bring up a menu for copying the answer, inserting the answer into the open Word document (e.g., at the cursor or for a specific section) or into new Word document. All text will be inserted with formatting (e.g., bold/underline, strikethrough, header sections, etc.). In addition, if you generate SVG or HTML text, you'll be presented with additional options for opening the generated text in specific applications:
- Use these buttons to review previous prompts and corresponding LLM answers.
- To review the entire conversation with all answers and answers, press "All" button.
- Press this button to review the changes made by the LLM based on the prompt, such as when rewriting a portion of the text. You'll also be able to compare between all iterations of LLM answers and prompts that took place during the conversation.

- Press this button to clear all chat context. Doing so will delete all information (i.e., prompts, answers, documents) that may have been temporarily uploaded/used by the configured LLM service. All of the same information/chat context (i.e., prompts, responses, documents) is also explicitly deleted from cloud-based LLMs via API as soon as the "Generate/Analyze with LLM" window is closed in Word.
- Switch to this tab to view the additional context for each prompt and the LLM response. For example, this section may include further instructions to the LLM, guidelines for formatting the answer, etc.
- Press these button to increase or decrease the font size shown in the Questions & Answers and Prompt windows.
- Toggle these buttons to specify whether you are generating text, images, or claim charts using the configured LLM. Here's more information about generating images and claim charts.
- This dropdown lets select a filter for the template names shown in item 13 based on their tags. This lets you limit the number of selectable templates based on the tag of interest, such as "claim writing", "OA analysis", etc.
- Specifies the name of the selected LLM prompt template.
- Pressing this button will clear the template filter.
- Pressing this button will bring up LLM prompt template settings.
- Press this button to bring up the LLM Configuration Settings.
- Use the Attach Files/Workspace to attach any files or a local document workspace for the prompt before it's sent to the LLM.
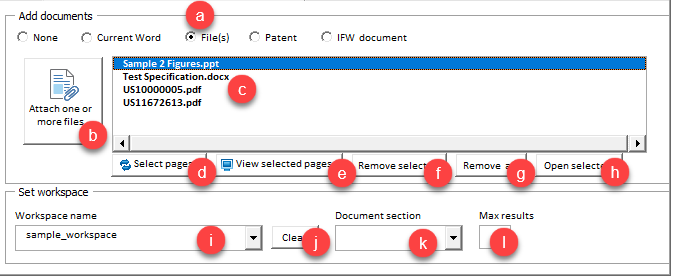
- Here you can specify whether to attach any documents to the prompt:
- "None" - prompt doesn't contain any attached files.
- "Current Word" - current Word document will be added as attachment.
- "Files" - you can add one or more files to the prompt. You can attach PDF, PPT, Visio, Word, Text, CSV, JPG, PNG files.
- "Patent" - you'll be prompted to specify a patent #, so that ClaimMaster can download and attach it to the prompt
- "IFW Document" - you'll be prompted to specify an application # and IFW document type, so that ClaimMaster can download and attach it to the prompt
- Press this button to attach files, patents, or IFW documents (based on the radio button selection above)
- Specifies the list of the currently attached documents
- Click on this button to select specific pages from the currently attached PDF file (only available for PDF/PPT/Word files).
- Press this button to view the selected pages of the attached file.
- Press these buttons to remove the selected file from the attachment list.
- Press this button to remove all attached files
- Press this button to open the selected file in the list
- Use this drop-down menu to specify the pre-configured local document workspace to be used for the prompt
- Press this button to clear the selected document workspace
- Specify which sections of local documents (e.g., Background, Abstract, etc.) should be used when pulling data from the database.
- Specify the max # of text snippets that would be pulled from the vector database, so as to limit the amount of data to be sent to LLM
- Press this button to repeat the last prompt
- Press this button to add a separator (i.e., "###") into the prompt text
- Press this button to save the current prompt
- Use this slider to make LLM responses more or less random/deterministic. Corresponds to the temperature setting for the LLM. Higher values will make LLM output more random/creative, while lower values like.will make it more focused and deterministic. It's a good practice to always review LLM responses for factual correctness, especially if you are using LLM prompts with settings for higher response randomness/creativity.
- Press this button to the send the prompt to the configured LLM service. The response will be shown in the Questions & Answers (item 3).