The +Shells versions of ClaimMaster include a powerful library of Office Action shell response tools. Specifically, ClaimMaster lets you to identify and browse rejections, objection, and allowances in the USPTO Office Actions (“OA”). You can also generate shell documents filled-out with bibliographic data, claims from previous OA responses, and contents of the OA based on pre-defined templates, such as responses and reporting letters/emails.

Follow these steps to quickly generate shell Office Action responses and other shell documents in ClaimMaster:
- Select whether to analyze Office Action or proceed directly to shell generation
From the ClaimMaster Ribbon, click on the USPTO Office Actions, Shells, and Forms menu, then select Analyze Office Actions and Generate Shell Documents, then Analyze Office Action + Generate Shells.

In case you don’t need to analyze an Office Action and just want to generate a shell document without Office Action data (e.g., just fill out the header + claims), you can proceed directly to shell generation by invoking the Generate Shells (without Office Action analysis) menu option.

If you are not analyzing OA, you can skip to step 8 in the tutorial.
- Load Office Action into the OA Browser
Next, if you need analyze the contents of OA, you’ll need to load the existing Office Action document into the tool. You have several options for this: (1) analyze the existing Office Action already opened in Word or (2) point ClaimMaster to the existing PDF or DOCX Office Action document. Office Actions are available for download from Patent Center in both DOCX and PDF formats. We recommend you download Office Actions in DOCX format to avoid any artifacts due to incorrect OCR, but ClaimMaster will also work with PDF files.
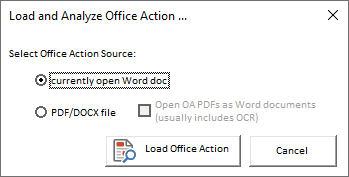
Note – when working with OA files in PDF format, if “Open OA PDFs as Word documents” checkbox is enabled (default), ClaimMaster will attempt to open PDF documents directly inside Word, as the later versions of Office are able to OCR and import PDF documents into DOCX format really well. Otherwise, you can also use ClaimMaster’s built-in OCR functionality to import text from the PDF OAs.
- Review identified rejections in the OA
Once the OA is loaded into the OA Browser, you will get a list of rejections, objections, and allowances identified in the OA. If you click on the specific row in the table, the tool will navigate to the annotated OA page in the document, allowing you to quickly browse the identified sections of the OA. In addition, you can insert highlights and hyperlinks to the patent prior art into the OA file (if OA is opened inside Word).

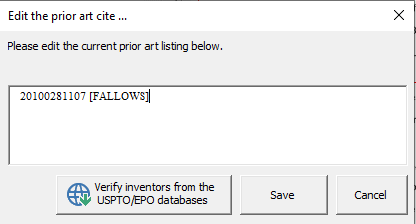
- Edit citations (optional)
If you notice that some claim listings or cited prior art references were not correctly identified (this could be due to the errors in OCR), you can bring up the edit menu by right-clicking on the incorrect item. In addition, from the same menu, you can add new references or remove extra references from the rejection summary.

When editing references, you can either directly type in the reference cite and click Save or first verify the inventor name in the cite from the USPTO/EPO database and then save your edits.
- Review claim status table (optional)
You can also switch to the Claim Status Table tab to get a quick overview of all claims identified in the OA and see whether they’ve been addressed, and if so, allowed, objected to, or rejected (and also see the grounds for each rejection):

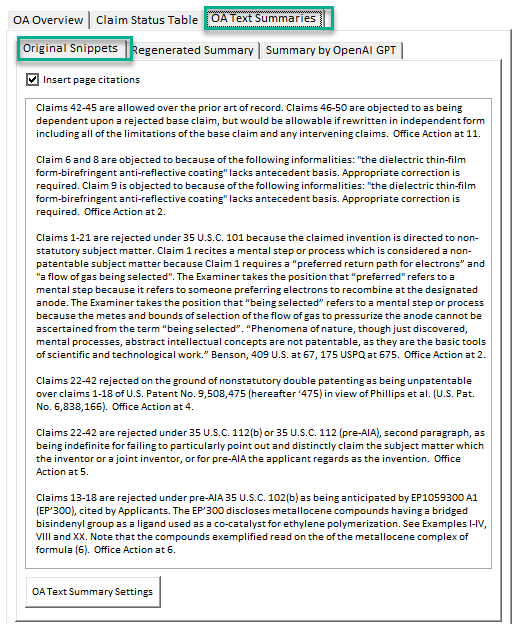
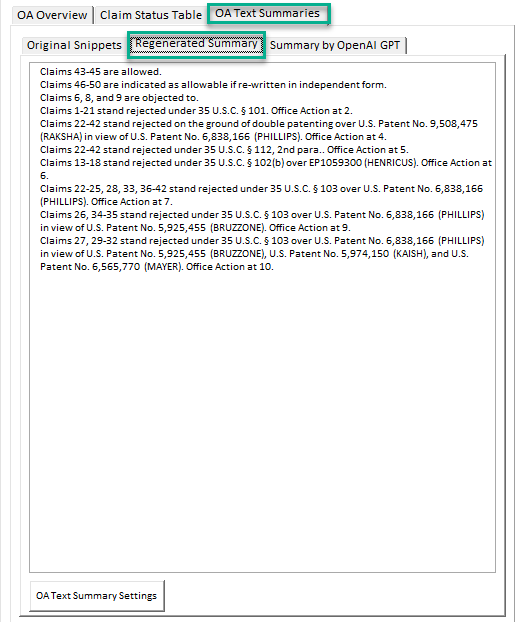
- Review and edit OA summaries (optional)
You can switch to the OA Text Summaries tab to review textual summaries of the OA in several different formats.
First, ClaimMaster can create a summary of the OA using the original snippets of rejections/objections/allowances extracted from the OA document (only when analyzing DOCX documents). You can make further edits to this summary, if you’d like, as this will be the OA summary blurb that will be inserted into the shell response at the [OASUMMARY_ORIGINAL] replacement field.
In addition, ClaimMaster can also compose a summary of the OA using your own preferences, including specific formats for prior art citations. You can make further edits to this summary, if you’d like, as this will be the OA summary blurb that will be inserted into the shell response at the [OASUMMARY_COMPOSED] replacement field. For more information for configuring your OA Summary settings, please click here.
- Download prior art cited in the rejections (optional)
Once ClaimMaster identifies rejections in the OA, you can also click on the Download cited art button to download PDFs of the cited references from the USPTO/EPO. You’ll get a list of all successful downloads in the window, from where you’ll be able to open the files or email/print them.

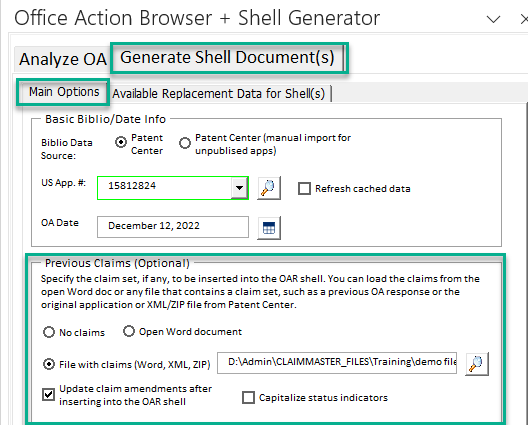
- Specify basic options for shell generation
To generate shell document(s), switch to the Generate Shell Documents tab. Here, you’ll be able to specify the application # for your shell documents. Normally, the software will attempt to detect the application number from the OA, but if that doesn’t work, you can just manually type in the application number into the field below to pull bibliographic data. For published applications, ClaimMaster will automatically pull the corresponding bibliographic information from Patent Center. For unpublished applications, you can perform manual import from the private view of Patent Center. You can also add the OA date, if it wasn’t automatically extracted from the DOCX document (usually missing the cover page).
In addition, you can point ClaimMaster to the document with the latest set of claims so that they can be imported and inserted into the shell. If claims are added, they will replace the [CLAIMS] replacement field in the shell and will be imported with updated status identifiers/amendments, as set forth in your settings.
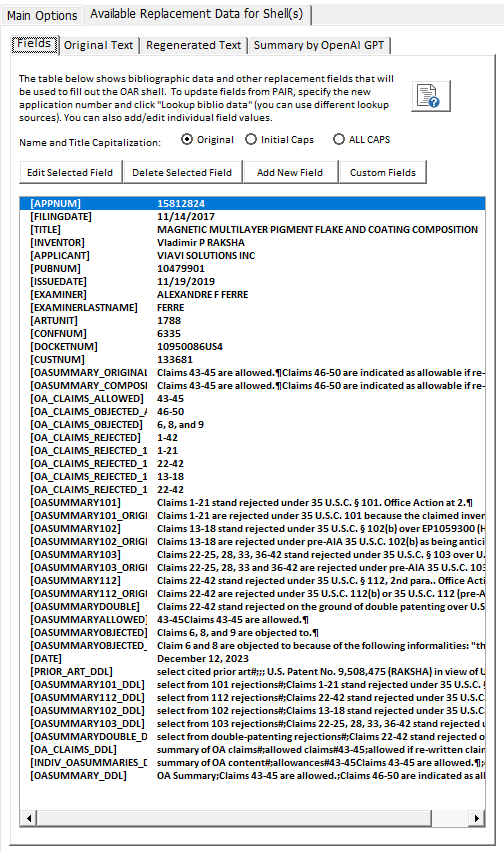
Finally, if you switch to the Available Replacement Data for Shell tab, you see a table of all data that will be used to fill-out the header in your shell documents using corresponding replacement fields, including bibliographic data (from Patent Center), various OA content information, and also imported claims from the previous response or the original application.
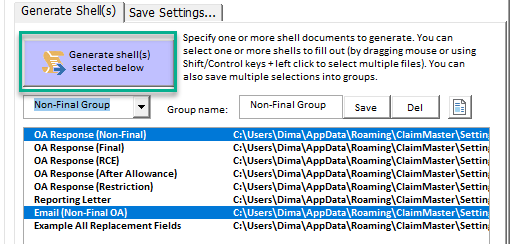
- Generate Office Action response shells and packages with supplementary documents
Once you confirm that the OA summary and bibliographic data is correct, you can proceed to generate any number of shell documents based on the templates pre-configured in ClaimMaster. You can generate multiple documents, such as OA response and reporting letters/emails, simultaneously – just select the desired documents in the table and click on Generate shell(s) selected below button. These documents will have the configured replacement fields populated with the specified OA, bibliographic, and claims data. To select multiple documents at once, you can define and save commonly-used documents groups.
In addition, you can tell ClaimMaster to create OA packages that include other documents in addition to the filled-out shells. You can specify this under the Save Settings tab. All generated documents could be saved to a specified directory or stored in a zip file. For example, your OA response packet might include:
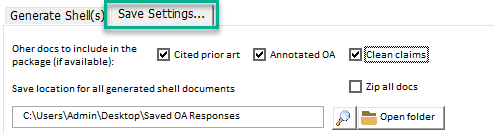
* Draft Response – an office action response shell with your application information, caption, response, current claim language, and rejection bases already populated;
* Office Action – an OCRed and annotated version of your office action, allowing you to quickly search the document for rejections, cited art and other key phrases;
* Cited Art – PDFs of the art cited in your office action; and
* Clean claims – a document containing clean claims without amendments for reporting.
* Client Letter – a letter that can be either mailed or emailed to inform your client of the rejection bases and art cited; and
* Client Reporting Email – a draft Outlook email (.msg) with all the necessary attachments and the summary of the Office Action.
- Further help/information about the related features
OA Browser Help – further information about OA Browser options and advanced features
OA Template Wizard – a tool that helps you turn existing OA responses into OA shells that can be reused within ClaimMaster
Setting up OA Shell templates – learn how to quickly set up and edit OA existing shells
Using OA Response Assistant – a handy tool for quickly inserting boilerplate response language and other information into the existing OA responses