Last week, we’ve covered a number of hidden ClaimMaster features for performing patent proofreading operations more efficiently. In this post, we continue to discuss some of the lesser-known yet helpful ClaimMaster features in our Office Action shells, USPTO forms, and downloading tools.
1. Share common templates and boilerplate paragraphs within the firm
We often get questions about whether it is possible to deploy or share the same set of shell templates and boilerplate entries for the entire firm. The answer is yes. Shells and boilerplate entries are stored in stand-alone documents, so all you need to do is to store these files at some common location that’s accessible to all ClaimMaster users, such as a network folder, and then configure ClaimMaster to load its settings from that location. As a result, all ClaimMaster users in the organization will have access to a unified set of shell templates and boilerplate settings.
The shared locations for both shell templates and boilerplate entries can be configured from the ClaimMaster->Preferences menu.
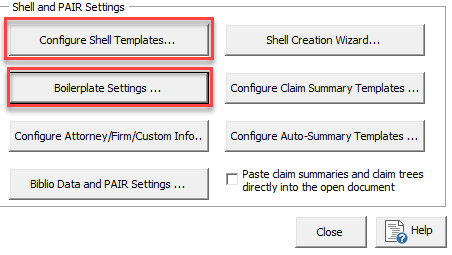
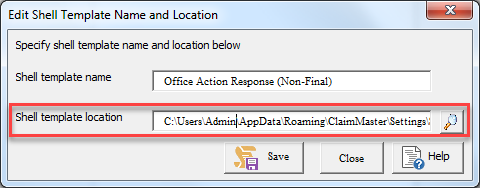
To configure a network location for your shell templates, click on ClaimMaster->Preferences->Configure Shell Templates, which will bring up the window for configuring shell templates. From there, you’ll be able to either add new templates or edit the existing template settings. In both cases, when editing or specifying a new template, make sure that the shell template location points to the shared network drive. You can specify the template location using either the mapped drive path or the full UNC path.
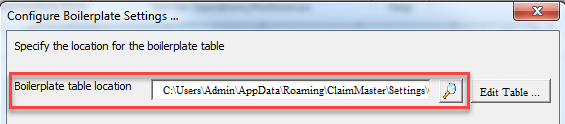
You can also configure a shared boilerplate file location in a similar way. Click on ClaimMaster->Preferences->Boilerplate Settings and then specify either the mapped network drive or UNC path to the location of the shared folder where the boilerplate table file is being stored.
To learn about customizing shell templates, click here. To learn more about customizing boilerplate entries, click here.
2. Customize patent family trees
ClaimMaster lets you extensively customize the information shown in the generated patent family claim trees. Specifically, in addition to specifying whether to include the specific PAIR information in each application box (e.g., title, examiner, art unit, etc.), you can also add arbitrary text annotations to each box by using a stand-alone custom tags file, such as shown in the example below:
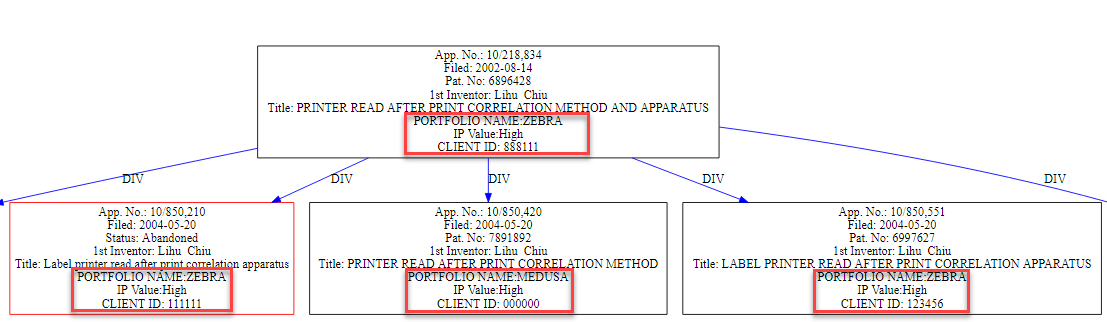
To specify the file with custom application tags, switch to the Custom Tags tab in the Patent Family Tree tool and specify the location of the CSV file that contains custom application tags.

The CSV file itself should contain two columns – the first column listing application numbers (no commas) and the second column listing custom tags for each application. You can insert multi-line annotations by separating each new line with a “\n” break, as shown below. When a custom tags file is specified, ClaimMaster will insert these annotations into each application box after the standard bibliographic data.

In addition, you have some additional graph options available under the Graph Options tab, where you can specify whether to insert the legend into the image, set arrow direction (i.e., to or away from the dependency), and also specify whether ClaimMaster should verify inconsistent dependencies and inventor names (this may help identify wrong priority chains in your applications).

Practice tip: since family tree generation using PEDs as the source is very fast, you can make quick customizations to the family tree in two passes. In the first pass, generate the tree for your family using HTML format, then switch to the Family List and Biblio Data tab and export the list of identified applications to a CSV file. You can then quickly convert this file to a custom tags file by adding the desired annotations for each application row (make sure to remove commas from the listed application #s) and, in the second pass, re-run the process with the custom tags file to get the annotated patent family tree.
To learn more about the patent family tool, please click here.
3. Download English abstracts for foreign IDS references
Per MPEP § 609, “submission of an English language abstract of a reference, such as one generated by a foreign patent office, may fulfill the requirement for a concise explanation” when submitting an IDS. Helpfully, front pages of the WIPO publications (i.e., #s starting with WO) often contain English abstracts and are easy to quickly download in ClaimMaster.
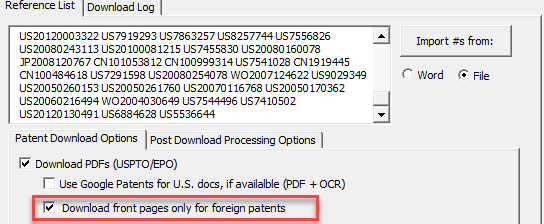
To collect just the front pages of foreign publications, launch the Batch Download tool by going to ClaimMaster->Downloading Tools->Batch Download Patents and Publications. Then cut & past your prior art list into the reference list section of the tool and make sure to check the Download front pages only for foreign patents checkbox under the PDF option. ClaimMaster will then quickly download the front pages of these documents (including translated Abstracts), which you can submit to the USPTO along with the filled-out IDS form also generated in ClaimMaster.
4. Generate claim charts for a group of patents
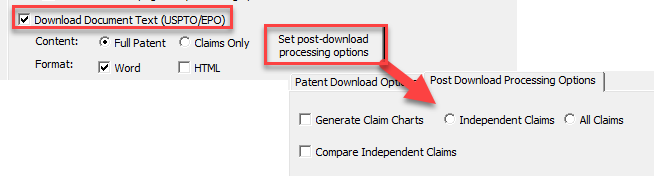
Our Batch Download tool has another helpful feature. In particular, there may be times when you need to generate claim charts for a large number of patents. ClaimMaster makes this operation straightforward. In the Batch Download tool, select Download Document Text option and then also set the post-processing option to Generate Claim Charts, enabling either a mapping of all or just independent claims. ClaimMaster will generate a claim chart for each specified patent and you’ll be able to access it from the downloads section of the window after the downloading process completes. Similarly, you can also compare independent claims within each identified reference as a post-processing operation.
5. Customize downloaded IFW file names
When downloading documents from PAIR, ClaimMaster lets you specify a custom file naming template for the downloaded IFW files using replacement fields that will be replaced with the actual bibliographic/date information for each downloaded document. To specify the template, open the PAIR download tool (ClaimMaster->Downloading Tools-> Download Data from PAIR), then switch to the Download Settings tab at the bottom of the window. Here you’ll be able to specify the custom naming template using available fields, as shown below. Note – please take care not to use characters in your template that are forbidden by Windows in file paths, such as * ” / \ [ ] : ; | ,.

If you specify a custom file naming template, the downloaded documents will be named according to the fields set in your template, such as shown below:

6. Clean up text of the OCRed Office Actions to improve recognition
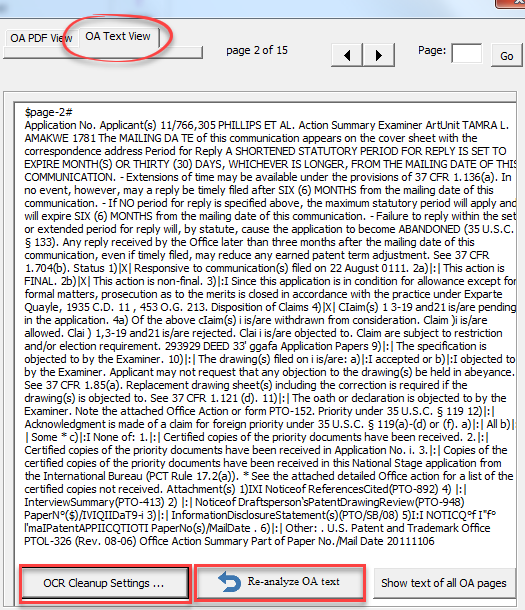
ClaimMaster does a pretty good job of figuring out rejections and objections in Office Actions. However, there are occasionally situations when the quality of the OCRed text interferes with correct analysis of the Office Actions in PDF format – that’s why we always recommend using a DOCX Office Action as the source, if it is available. If you do not have access to a DOCX copy of the Office Action and you notice that the Office Action analysis tool is not correctly identifying certain rejections, you can switch to the OA Text View tab in the tool and edit the OCRed text directly, hopefully changing the incorrectly parsed symbol or text of the rejection/objection. Once you make the edit, you can click on the Re-analyze OA text button to rerun the analysis based on the edited text.
In addition, when the rejections are identified in the Office Action browser, you can right-click on the tree elements to edit claim listings and also edit/add/remove references. This operation will automatically update text summary of the Office Action.

For more information about Office Action analysis, please take a look at this section of the manual.
7. Import bibliographic data from your docketing system into ClaimMaster
While ClaimMaster can quickly pull bibliographic data from PAIR or PEDs services, you can also import data from your docketing system into ClaimMaster’s PAIR cache, where this data can be reused to fill out headers in shells and IDS forms. Most commercial docketing systems (e.g., FIP, Cardinal IP, etc.) should allow you to export stored bibliographic data to a CSV file. Once you have exported the data to a CSV file, you can then use our wizard to import this data inside ClaimMaster.
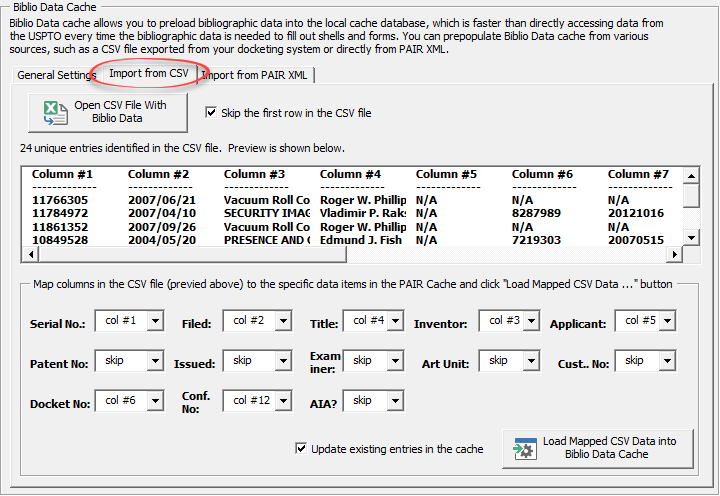
To start the CSV import/mapping, open ClaimMaster->Preferences->Biblio Data and Pair Settings window. Next, switch to Import from CSV tab in the Private PAIR settings dialog, as shown below. Then specify the import CSV file, preview its columns, map these columns to the data stored in the ClaimMaster cache, and finally complete the import.
In addition, you can make modification directly to the PAIR cache file, as explained here. Notably, the PAIR cache file can also be stored in the shared location like boilerplate and shell settings, so that all firm users have access to the same PAIR bibliographic information.
For more information about importing your docketing data into ClaimMaster, please see here or feel free to contact us.